Having tested my soldering skills in a couple of smaller projects, I gathered the courage to put my faithful Trends TA10.1 mini amplifier under the knife. Big time.
The Trends TA10.1 is a well-received small amplifier operating in “class-D” utilizing Tripath TA2024 chipset, "Class-T". There are plenty of Tripath amplifiers available for DIYers and complete amps for the “usual” listeners such as the ones Trends made. Wikipedia states that Tripath went bankruptcy in 2007, making all the T-amps somewhat unique – who knows they might be even valued one day for their scarcity. Still, today you can find them new quite easily.
 |
| Staring point |
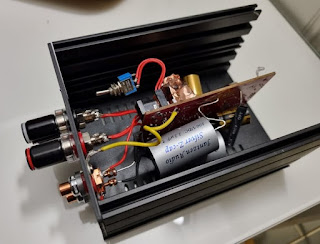 |
-New casing, 80x124x170mm
-RCA connectors, Copper core by Clear Components
-Binding posts, Rhodium plated by Clear Components
-DC connector, generic gold plated
-Power switch, generic high quality
-Input caps, Jantzen Silver Z-Cap MKP 2% 2,2uF
-Bias cap MKP2, 100nF, 5%
-Decoupling caps, NICHICON KG GOLD TUNE 50V 2200μF
-Signal cabling, Neotech SOCT-16/20 AWG
-Removed the RF Caps in “Cd1” (might not work well in all setups)

-By placing the PCB vertically inside the case, I could utilize both sides of the board. The board itself offers some form of signal insulation between components.
-Bypassed input signal greatly by soldering input caps directly to RCA sockets – bypasses jumpers and volume pot and utilizes Z-Caps silver leads.
-Copper foil as shield around inductor coils. I suppose this could be grounded for better effect.
-Heatsink for the TA2024 chip.
-Soldering power switch cables directly to PCB without quick connector.
-After the rebuild, I adjusted the output bias. The Trends has two small caps with knobs, one for each channel, that can be adjusted by placing multimeter to speaker + and - outputs.
You could always go with more expensive connectors, caps etc. but I tried to keep some sense of realism with this one. In hindsight the rhodium binding posts could have been copper ones, as together with Jantzen Silver caps the highs might be a teeny weeny too pronounced. But this can be compensated with IC and speaker cabling. Next step would be to pair the Trends with a linear power supply, as now I am feeding it 13.5V with a generic switching power supply. At this voltage the chip gets hot, but it has been working for years. The datasheet states max voltage for the TA2024 to be 13.2V and nominal 12V. More voltage means slightly more output power. Being a low voltage piece of equipment gave me the confidence to proceed with the heavy mods, as ~12V won't be life threatening any time soon.
 |
| Finished and singing again! |
All in all, the transformation of the amp was not exactly cheap, but then again not very expensive either considering you could easily spend several hundred euros for a pair of RCA cables.
But then we have the question; was it worth it? Oh yes! It’s hard to say which mod did what to the sound quality and by how much, therefore one must address the project as a whole. The modding, or rather rebuilding at this point, took the Trends to a whole another level, no doubt about that. The improvements in clarity, dynamics and staging were obvious. And in addition, if one enjoys tinkering and soldering – building something on your own – then any project like this will be always worth it. For me this was an excellent learning experience, and I am more than happy with the end results, although inside the case it might look a bit amateurish. But I take pride in this unique piece that I made myself. And oh brother, it does sound good on top of that. Although at this point, I am heavily biased. But I don’t care! 😉
ps. Now I just need to find some +100dB sensitive horn speakers to really try this thing out.
pps. That aged well. I realized I had a suitable Sbooster PSU in my other setup feeding a DAC. It's output of 13.2V is just what the doctor ordered. I hooked it up with the rebuilt Trends amplifier.
Yesss! Clear improvements in micro and macro dynamics, sense of easiness and lack of background noise were the first things I noticed. But then I realized that once again, the details are lifted - at least a two whole levels. I think this is might be thanks to the improved noise floor, the details become simply much more easier to pick up. Another thing is that amplifier now feels more powerful and the soundstage feels an inch or two closer. Since the Sbooster has its own power switch, I could bypass the one if the amplifier... Well, maybe next time. For now I call the project completed 😎
No comments:
Post a Comment